Upload Iphone Backup From Itunes to Icloud
This web log post was originally published in 2016. Since then, Apple has rolled out a number of updates to its products and how their data is backed up, so nosotros're sharing an update to this post with the latest information.
Apple recently released the newest edition of their iPhone, boasting a new storage capacity selection of 1TB. That's a large upgrade for anyone looking to get the latest version, and all that extra space is certain to be filled up speedily with app information, photos, videos, and more. Yous wouldn't want to accidentally lose any of that important data, so information technology'due south important to make sure you lot treat backups for your phone with every bit much consideration as you do for your computer. Not only that, but software upgrades tin can also have the potential to wreak data havoc, so keeping consistent data backups ensures all your iPhone data stays safe and secure in the deject.
If you're using iCloud Fill-in or iTunes to dorsum up your iPhone, iPad, or iPod touch, read this post to empathize how those backups work, and learn what else you tin can practise to protect your information.
How to Dorsum Up Your iPhone to iCloud
Apple tree has tried to make backing up less of a job with iCloud Fill-in. This iOS feature lets your iPhone, iPad, or iPod touch back upwardly its contents to the deject. If yous're looking for the most frictionless way to back up your devices, this is information technology. The dainty matter about iCloud Backup is that y'all set it and forget it.
iCloud Backup happens automatically when your device is charging, locked, and is connected to Wi-Fi. Once you've configured your device for iCloud Fill-in, you should just be able to rely on the backups to happen periodically when you lot're charging.
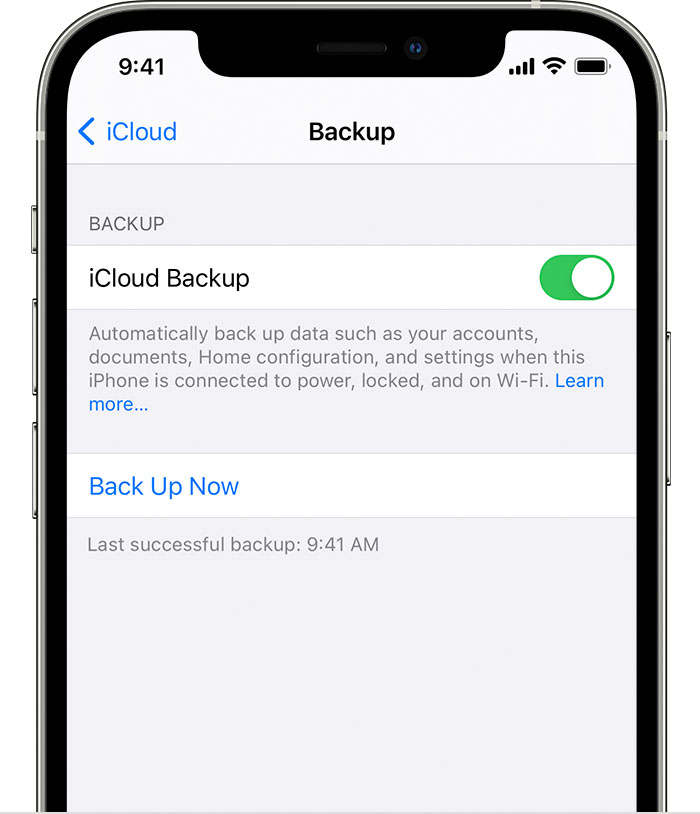
How to Use iCloud Backup on Your iPhone, iPad, or iPod Bear on
- Become to Settings.
- Tap your proper name at the top, then choose iCloud.
- Tap iCloud Backup.
- Tap Back Upwards Now. Stay continued to Wi-Fi until the process ends.
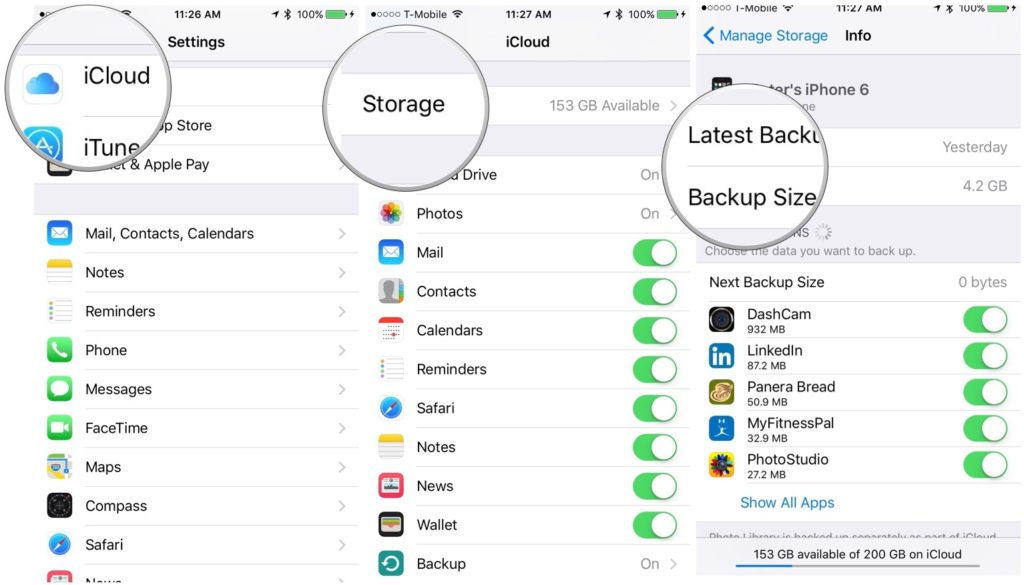
How to Bank check Your iCloud Backup
Make sure to stay connected to your Wi-Fi network until the fill-in is washed. Here'due south how to check your backup's progress:
Using iOS xi or subsequently and iPadOS:
- Become to Settings.
- Tap your name at the top, and so choose iCloud.
- Tap Manage Storage.
- Tap Backups.
Using iOS 10.iii:
- Become to Settings.
- Tap your name at the top, then choose iCloud.
- Tap the graph that shows your iCloud usage, then tap Manage Storage.
- Select your device. iOS will show y'all details nigh when it was last backed up, and the fill-in file size.
How Does iCloud Fill-in Work?
iCloud Backup lets you restore your device from almost anywhere. It also makes upgrading a cakewalk. When yous set a new iOS device, for example, the organisation will ask you lot if you lot want to restore from an iCloud backup.
In that location is a downside to iCloud Fill-in that you lot need to exist enlightened of. It's very dependent on a specific set up of deportment to piece of work:
- Your device needs to be continued to a power supply.
- Your device needs a Wi-Fi connection (and needs to be connected to the cyberspace).
- Your device needs to be locked.
- You lot demand to have plenty infinite in iCloud to store the fill-in.
This last item is the killer. Apple but gives you 5GB of free infinite with the basic iCloud account. If y'all have a lot of stuff on your iOS device or in the cloud, it'due south trivially easy to exceed your costless 5GB iCloud allowance, which ways your backups won't happen unless you pay Apple for additional iCloud space.
If y'all have both an iPhone and an iPad? Forget about it. You accept to pay Apple or y'all won't have plenty space to back upward both. iCloud storage ranges from 99 cents per calendar month for 50GB to $nine.99 a month for 2TB.
There's some other caveat, too. iCloud Fill-in doesn't back up everything on your phone. Things that aren't backed upwards include:
- Data that's already in iCloud: Contacts, calendar appointments, notes, and photos, for example.
- Data stored on other cloud services. For example, Gmail, or Microsoft Exchange postal service.
- Your Apple Pay info, and your Impact ID info (if your device is so equipped).
- Imported media files, like e-books, music, and videos you've acquired from services besides Apple Music, like Amazon or any content downloaded to your phone from your browser or an app.
- Any App Shop content (that stuff is nevertheless bachelor for re-download, it'due south just an inconvenience to reload).
Well-nigh of this makes a lot of sense. Since information is already synced in iCloud and other cloud services, there's no need to duplicate information technology in the backup. And as a thing of security, Apple Pay and Touch on ID info shouldn't exist kept in a backup either—that info remains the sole domain of specialized hardware on compatible iOS devices called Secure Enclave.
Equally long every bit yous understand the limits of iCloud Fill-in, it's an enormously helpful tool that makes backup, recovery, and upgrading a lot easier.
There'due south an culling that doesn't require you lot to purchase any more than space in iCloud and isn't dependent on a network connection, either: bankroll up locally. To do that, you can employ iTunes or Finder.
How to Back up Your iPhone to a Calculator
In 2019, Apple discontinued iTunes in its products, then it can no longer exist used as a fashion to back up your phone on a Mac unless you lot're running macOS Mojave or before. Still, iTunes is still available for Windows PCs. The expert news for Windows PC users is that you don't need an internet connectedness, don't take to pay for iCloud infinite, or any other shenanigans. All you'll need is enough hard drive infinite to accommodate the fill-in.
To do this, you'll accept to physically connect your iPhone or iPad to your Mac or PC using its USB sync cable. You can also configure iTunes to let backups over Wi-Fi.
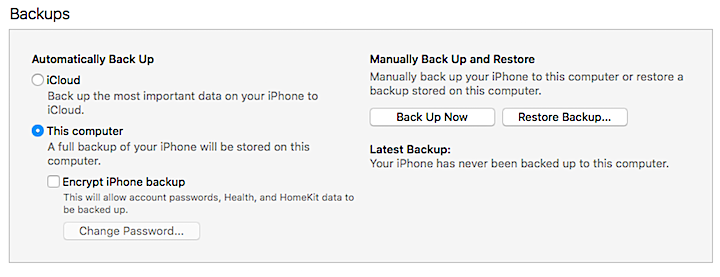
How to Back up an iPhone to iTunes
Using a Windows PC:
- Connect your iOS device to the PC you normally sync with, and connect using a USB or USB-C cable or a Wi-Fi connection. You tin learn how to turn on Wi-Fi syncing here.
- Double-click iTunes.
- You should see an icon for your device announced in the menu bar on the upper left side of the iTunes window. Click on it.
- Click Back up Now to brainstorm backing upward your iOS device to your computer. If you want to include account passwords, Health and HomeKit data, you'll need to make certain the checkbox entitled Encrypt iPhone backup is also checked.
- To see the backups stored on your figurer, cull Edit, so Preferences, and so click Devices. Yous will see encrypted backups shown with a lock icon in the list of backups.
Using MacOS Mojave or before:
- Open iTunes and connect your device to your computer with a USB cable.
- If y'all are asked for your device passcode or to Trust This Computer, follow the onscreen steps.
- Select your device on your estimator.
- Click Back up At present.
- When the process ends, you lot'll see that the backup finished successfully because yous'll be shown the appointment and time of your last backup.
As with iCloud backup, at that place are a few limitations you should be aware of with iTunes backup. Some information isn't backed up, past design:
- Content from iTunes and App Stores, or PDF files downloaded to iBooks.
- Imported music synced from iTunes on the computer, videos, books, and photos.
- Photos already stored in the cloud via iCloud Photo Library and My Photo Stream.
- Affect ID and Apple Pay settings.
- Activity, Wellness, and Keychain data (passwords), unless yous select "Encrypt iPhone backup."
Once more, nigh of these limitations make sense—you lot can re-sync the content y'all need and some stuff needs to be excluded as a matter of security.
Once yous're done, iTunes maintains a copy of that fill-in, which you can restore if you ever need to. Yous tin read near how to restore from a backup in the section below.
The added do good from connecting your iPhone or iPad to your Mac or PC using iTunes is that when y'all back up that Mac or PC, you will as well back up the contents from your iPhone or iPad.
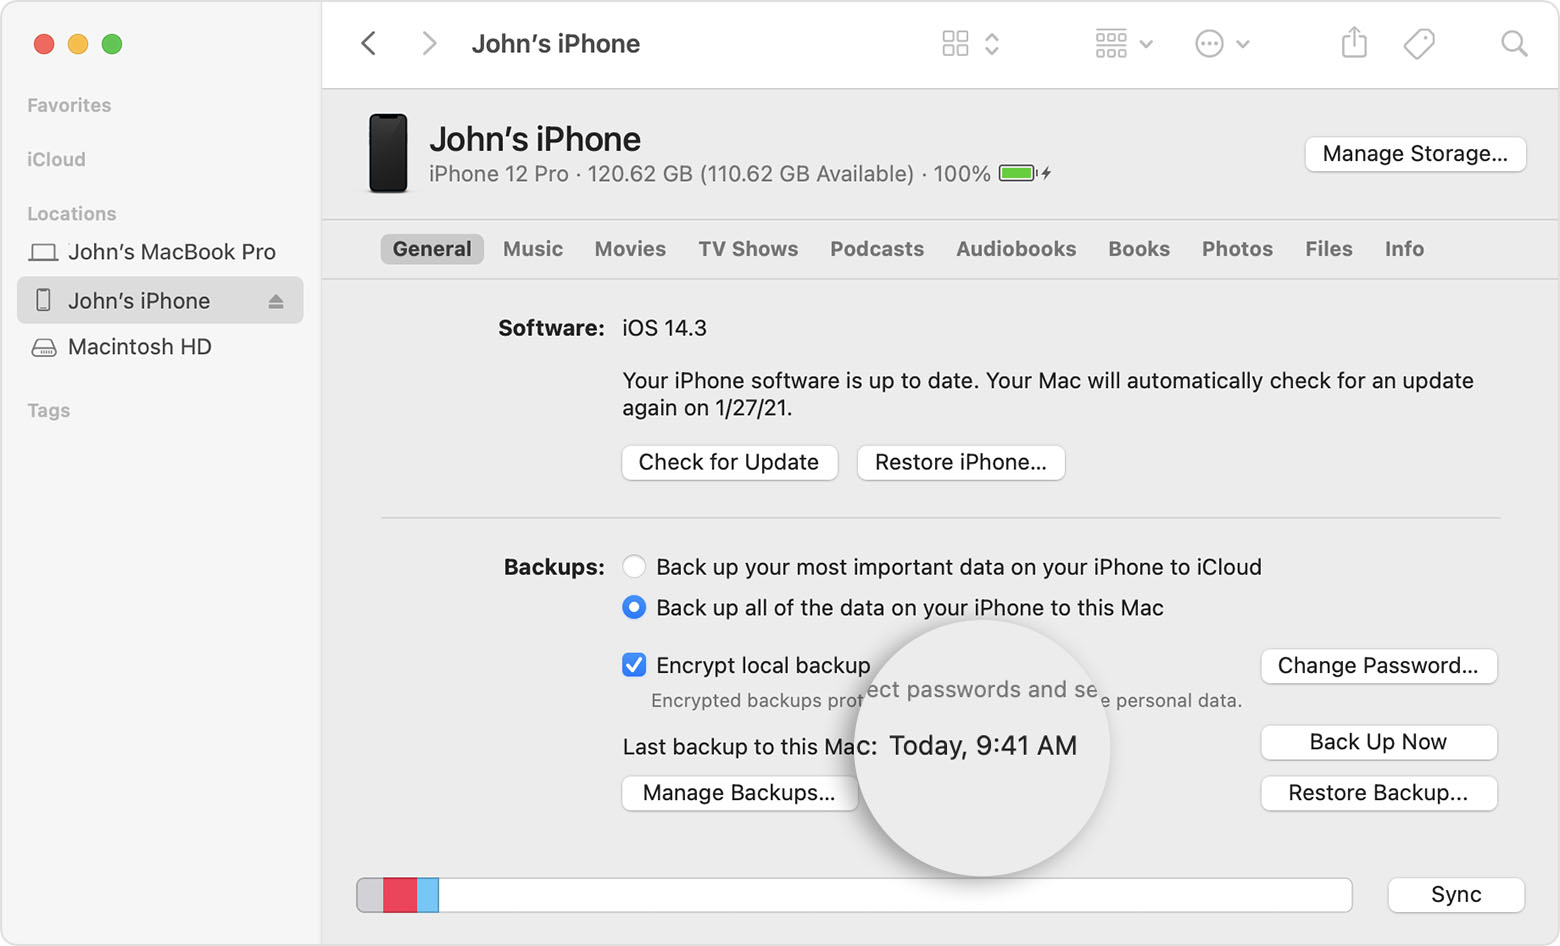
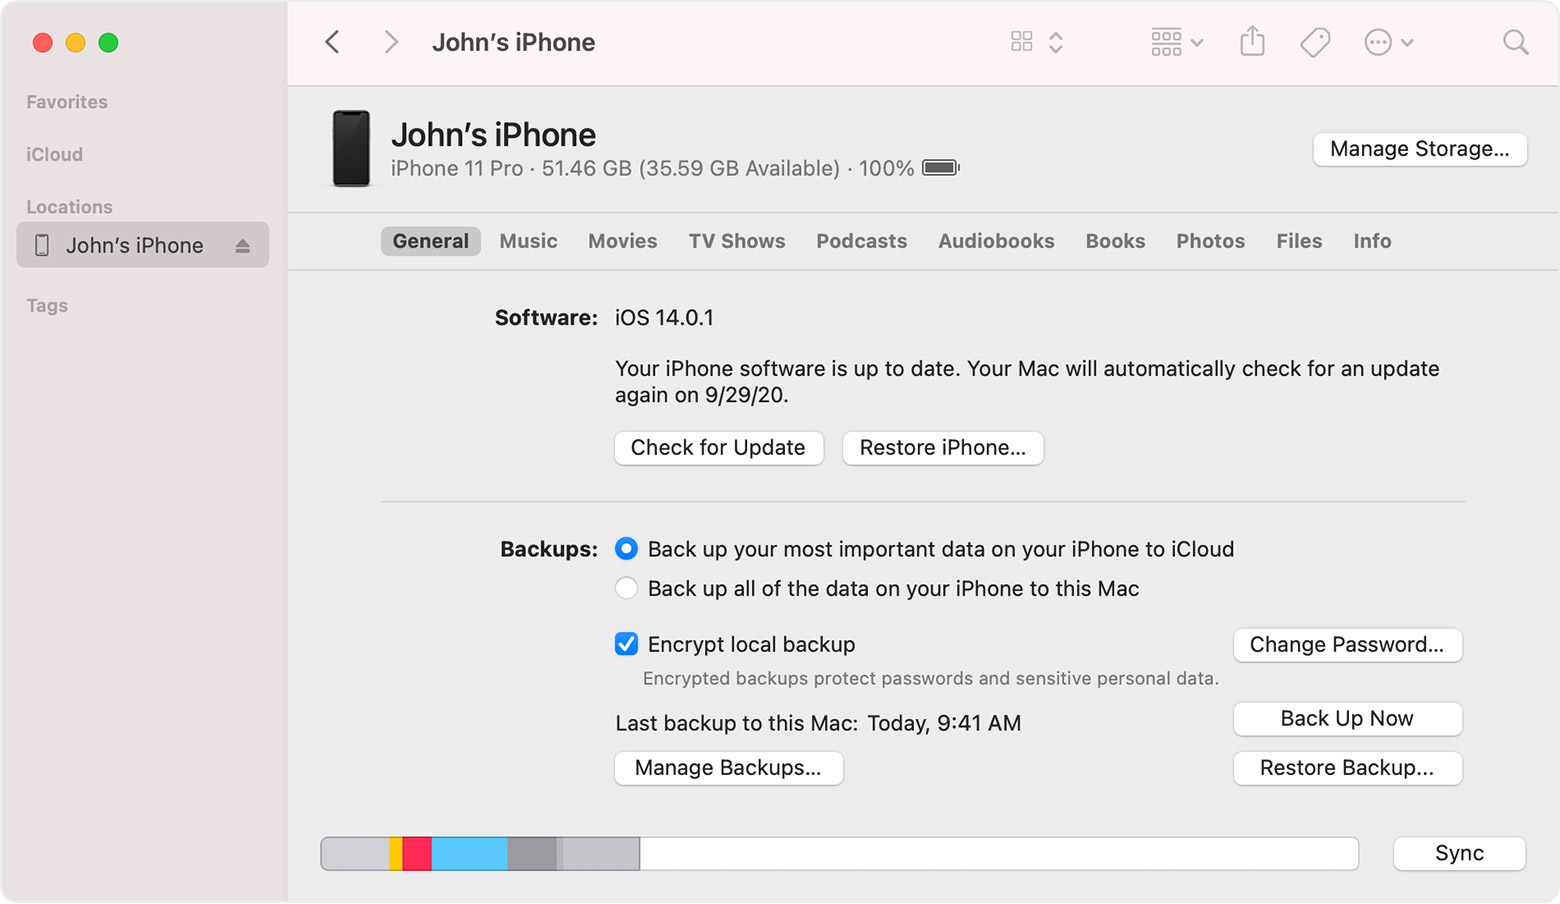
How to Back Up an iPhone to a Mac
- Using macOS Catalina or later, open a Finder window and connect your device to your computer with a USB cable.
- If y'all're asked for your device passcode or to Trust This Computer, follow the onscreen steps.
- Select your device on your computer.
- If you lot'd like to support the Health and Action data from your device or Apple Spotter, you demand to encrypt your backup by selecting the "Encrypt local backup" checkbox, which will crave yous to create a password.
- Select Back Upwards Now.
- When the process ends, you'll see that the backup finished successfully because you'll be shown the appointment and time of your last backup.
How to Back up iPhone Contacts
To create a backup of your iPhone Contacts, your device needs to be connected to Wi-Fi.
- First, get to Settings.
- Tap your name at the height, then tap iCloud.
- Tap the slider for Contacts to switch it on.
- If prompted, merge your contacts with iCloud.
- Tap the iCloud Backup app at the lesser of the list and switch it on.
- Tap Back up Now.
What About iOS Fill-in Apps?
Instead of using iCloud or iTunes, y'all can use fill-in apps to dorsum upwards the data on your iOS device. These types of apps tin exist helpful, but are usually limited to backing up your photos and your contact listing. Other information, such as application information, game data, texts, voicemails, etc., is not typically backed up by these apps. The near comprehensive way to back upward and restore the data on your iPhone is to use either iCloud or iTunes, or both.
The iii-2-ane Fill-in Strategy
Ideally, you should use both iCloud backups and periodic computer backups to brand sure you have at least two ways to restore your iPhone or your iPad if y'all demand to. And if y'all're a Backblaze Computer Backup user, all the ameliorate. Backblaze backs upwardly the contents of the system directory where your backups are kept, so if y'all're using iTunes or Finder and Backblaze, yous can be sure your iPhone information is safe.
Here'due south the bottom line when it comes to your mobile device'southward data: You don't want to take any chances. Make sure to have at least 2 backups: One local, through iTunes or Finder, and one in the cloud—either with iCloud Fill-in or using Backblaze.
The combination of iCloud backups, iTunes or Finder backups, and Backblaze provides you with a foolproof way to keep your mobile information safe and sound. For more on how to keep your data prophylactic, read almost the 3-ii-one backup strategy, which we think is the all-time style to make sure your data is safety.
How to Restore Your iPhone From a Backup
In case of data loss, or if you'd like to accept the data you lot backed up from an onetime iPhone on a new i, you can restore your data backup to your device. Depending on the method you used to back up your device information, there are a few different options for restoring from a PC or Mac running macOS Mojave 10.14 or before, a backup from a Mac running macOS Catalina ten.15 or afterwards, or an iCloud backup.
How to Restore Data From a PC or Mac With macOS Mojave 10.fourteen or Earlier
- Open up iTunes and connect your device to your reckoner with a USB cablevision.
- If you're asked for your device passcode or to Trust This Estimator, follow the onscreen steps.
- You lot should encounter an icon for your device appear in the menu bar on the upper left side of the iTunes window. Click on it.
- Click on Summary, then click on Restore Backup.
- Expect at the date of each backup and selection the one you want to restore from.
- Select Restore and wait for the restore time to finish. If prompted, enter the countersign for your encrypted backup.
- Continue your device continued until afterwards it restarts and syncs with your computer. One time the sync is washed, y'all can disconnect your device.
To restore information from a Mac with macOS Catalina 10.15 or afterwards, follow the same steps to a higher place in Finder.
How to Restore Information From an iCloud Backup
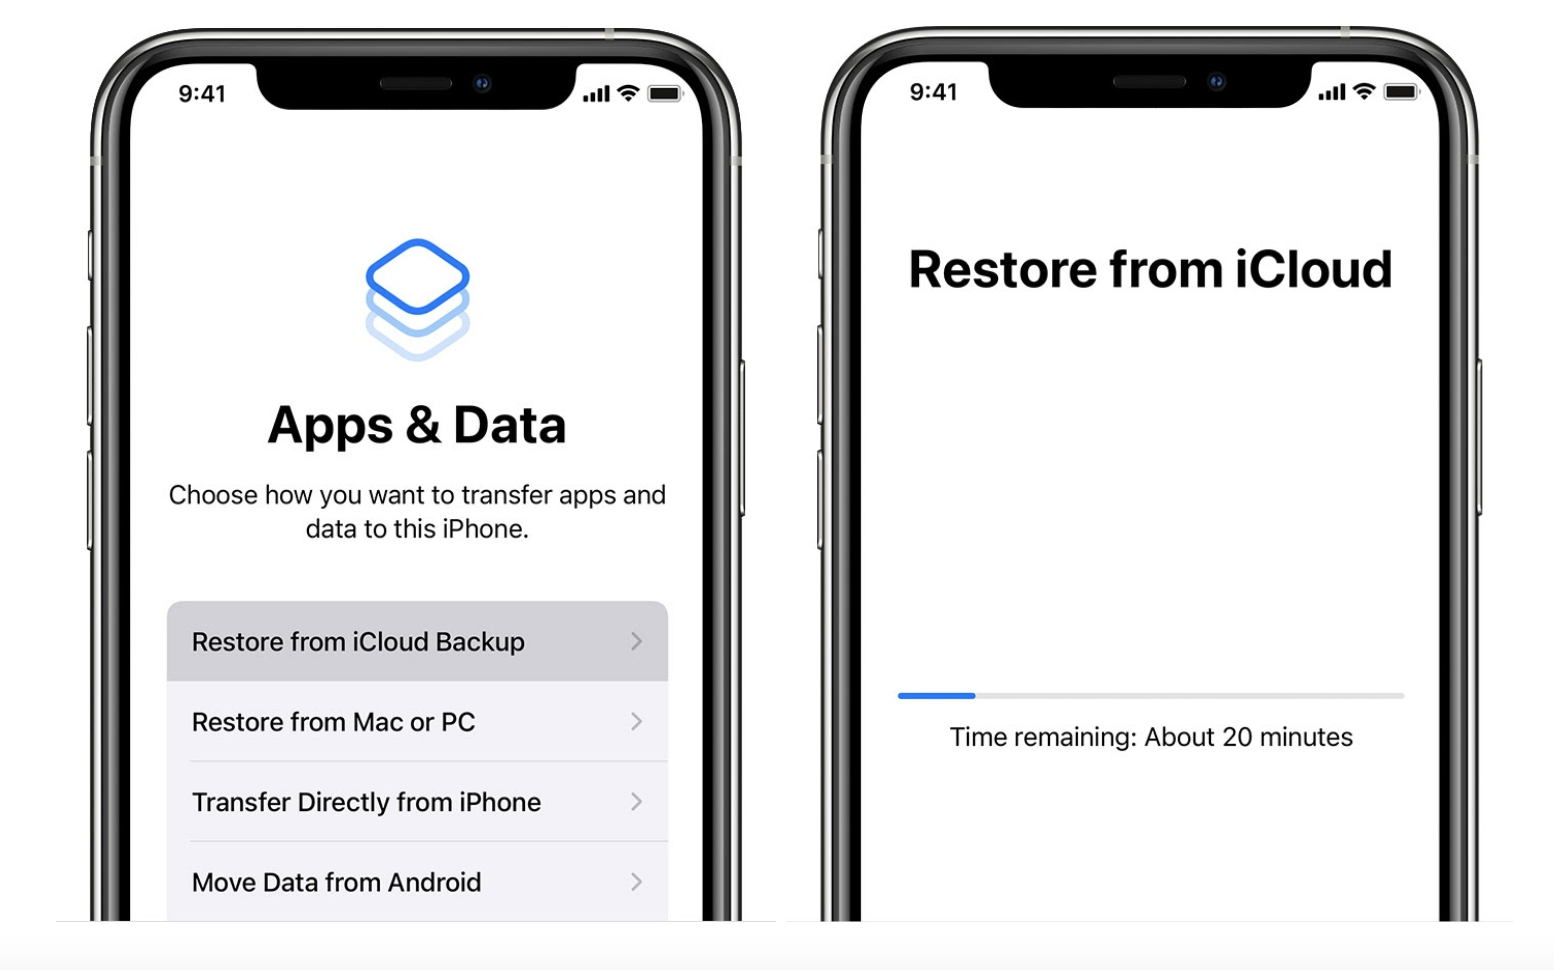
To restore from an iCloud backup, you lot demand to erase all of its content if you lot have already fix the device, or outset from a new device before yous can use these steps.
- Kickoff, switch on your device.
- Follow the setup steps until you get to the Apps & Information screen, then choose Restore from iCloud Backup.
- Sign in to iCloud with your Apple tree ID.
- Select a backup. Once you choose a backup, the data transfer starts.
- Once prompted, sign in with your Apple tree ID to restore your apps and purchases. You won't be able to use your apps until yous sign in.
- Keep your device continued to your Wi-Fi network and expect for a progress bar to appear and consummate the information transfer. Depending on how much data you have to back upwardly as well as your network speed, it might take a few minutes to an hour to consummate. If you disconnect from your Wi-Fi network before it finishes, the data transfer will pause until you lot reconnect.
Go on Your iPhone Information Safe in the Deject
Hopefully this has helped demystify what iCloud Backup and iTunes are doing to go along your mobile data safe, and what else you tin do to make sure you're protected. Still dislocated? Have a question? Or, do you lot use a dissimilar strategy that you lot'd like to share? Let the states know in the comments.
Source: https://www.backblaze.com/blog/how-to-backup-iphone-and-ipad/
0 Response to "Upload Iphone Backup From Itunes to Icloud"
Post a Comment